环境:
Windows 10,x64
node.js v10.14.2
npm 6.5.0
GitHub 创建 Github Pages 项目
创建一个名称为username.github.io的新仓库。username 为你的 GitHub 用户名。
搭建Hexo环境
安装node.js
简介
Node.js是一个 JavaScript 运行环境。
下载与安装
去官网下载对应版本
下载完后双击傻瓜式安装即可
安装完后win+R 输入cmd打开终端,然后输入node -v即可查看Node版本
安装npm
简介
npm是Node.js的包管理工具
npm安装 - 安装Node.js和npm - 廖雪峰的官方网站
为啥我们需要一个包管理工具呢?因为我们在Node.js上开发时,会用到很多别人写的JavaScript代码。如果我们要使用别人写的某个包,每次都根据名称搜索一下官方网站,下载代码,解压,再使用,非常繁琐。于是一个集中管理的工具应运而生:大家都把自己开发的模块打包后放到npm官网上,如果要使用,直接通过npm安装就可以直接用,不用管代码存在哪,应该从哪下载。
更重要的是,如果我们要使用模块A,而模块A又依赖于模块B,模块B又依赖于模块X和模块Y,npm可以根据依赖关系,把所有依赖的包都下载下来并管理起来。否则,靠我们自己手动管理,肯定既麻烦又容易出错。
安装
安装完Node.js以后npm已经顺带被安装了。
命令行输入npm -v即可查看npm版本信息。
安装Hexo
1 | npm install -g hexo |
初始化
新建一个空文件夹,在该目录下右键选择Git Bash Here(需要安装Git客户端)
执行命令(需要注意的是该命令必须在空目录下执行):
1 | hexo init |
安装依赖:
1 | npm install |
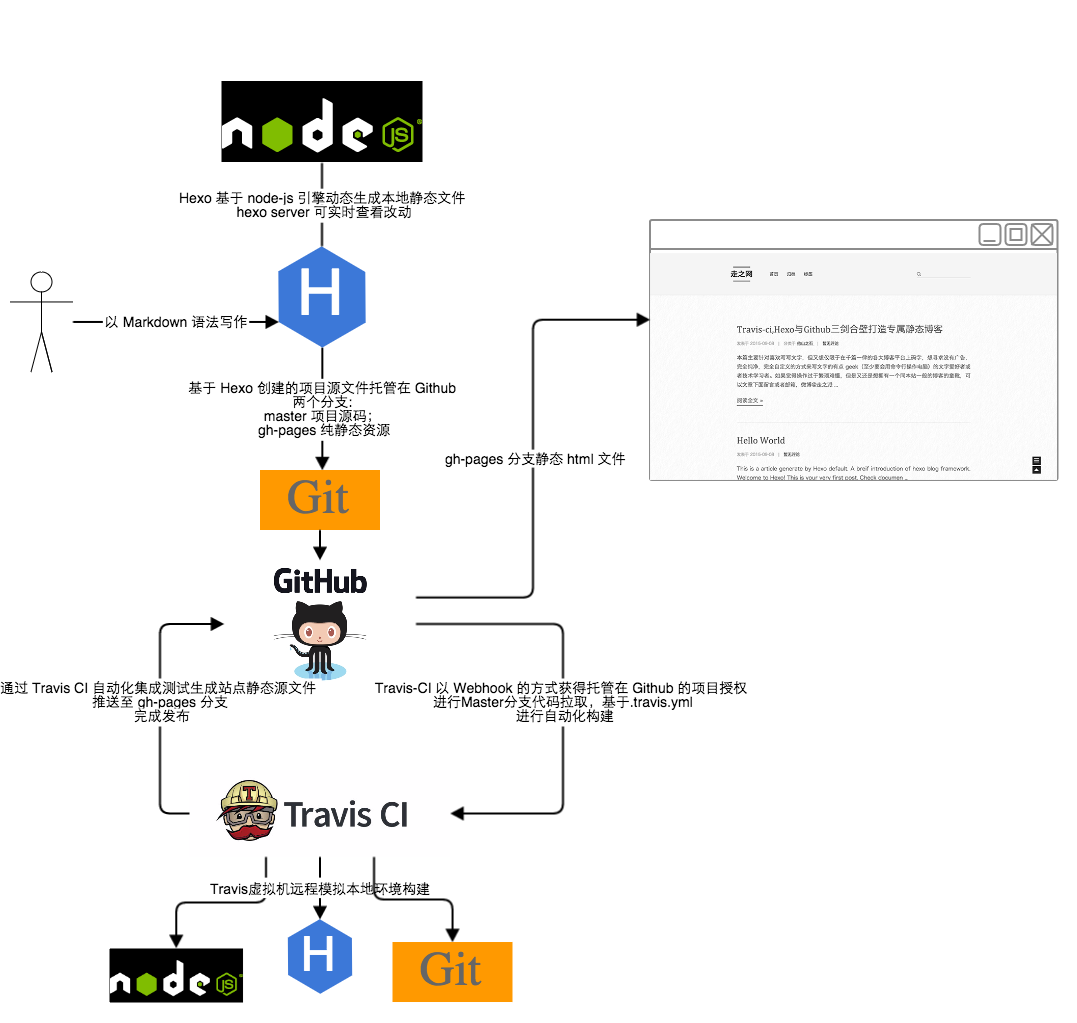
自动发布
Hexo 生成的静态文件统一存放在 public 目录下,其余的文件都是 hexo 用来生成静态网页的。
为了能够适应不同环境(不同主机、不同系统、甚至在 GitHub 网页端操作等),可以利用 Travis-CI/Gitlab-CI 对 Hexo 博客项目进行持续集成。
Travis-CI 的配置文件.travis.yml
1 | dist: trusty |
根据 NexT 的配置没能成功,所以只是将过程中了解到的配置含义标注了一下
1 | dist: trusty # Ubuntu 版本代号 https://zh.wikipedia.org/wiki/Ubuntu%E5%8F%91%E8%A1%8C%E7%89%88%E5%88%97%E8%A1%A8 |
远程仓库创建hexo分支对hexo源码进行版本控制
将远程仓库clone到本地
1
git clone https://github.com/username/username.github.io.git
创建本地分支hexo并切换到该分支
1
git checkout -b hexo
将本地仓库里的文件清空(除了
.git文件),替换为hexo源码文件(即hexo init生成的那些文件)。添加并提交到本地仓库
1
2
git add .
git commit -m "提交信息"创建并提交到远程hexo分支
1
git push --set-upstream origin hexo
GitHub生成Access Token
头像>Settings>Developer settings>Personal access tokens
点击Generate new token生成一个token
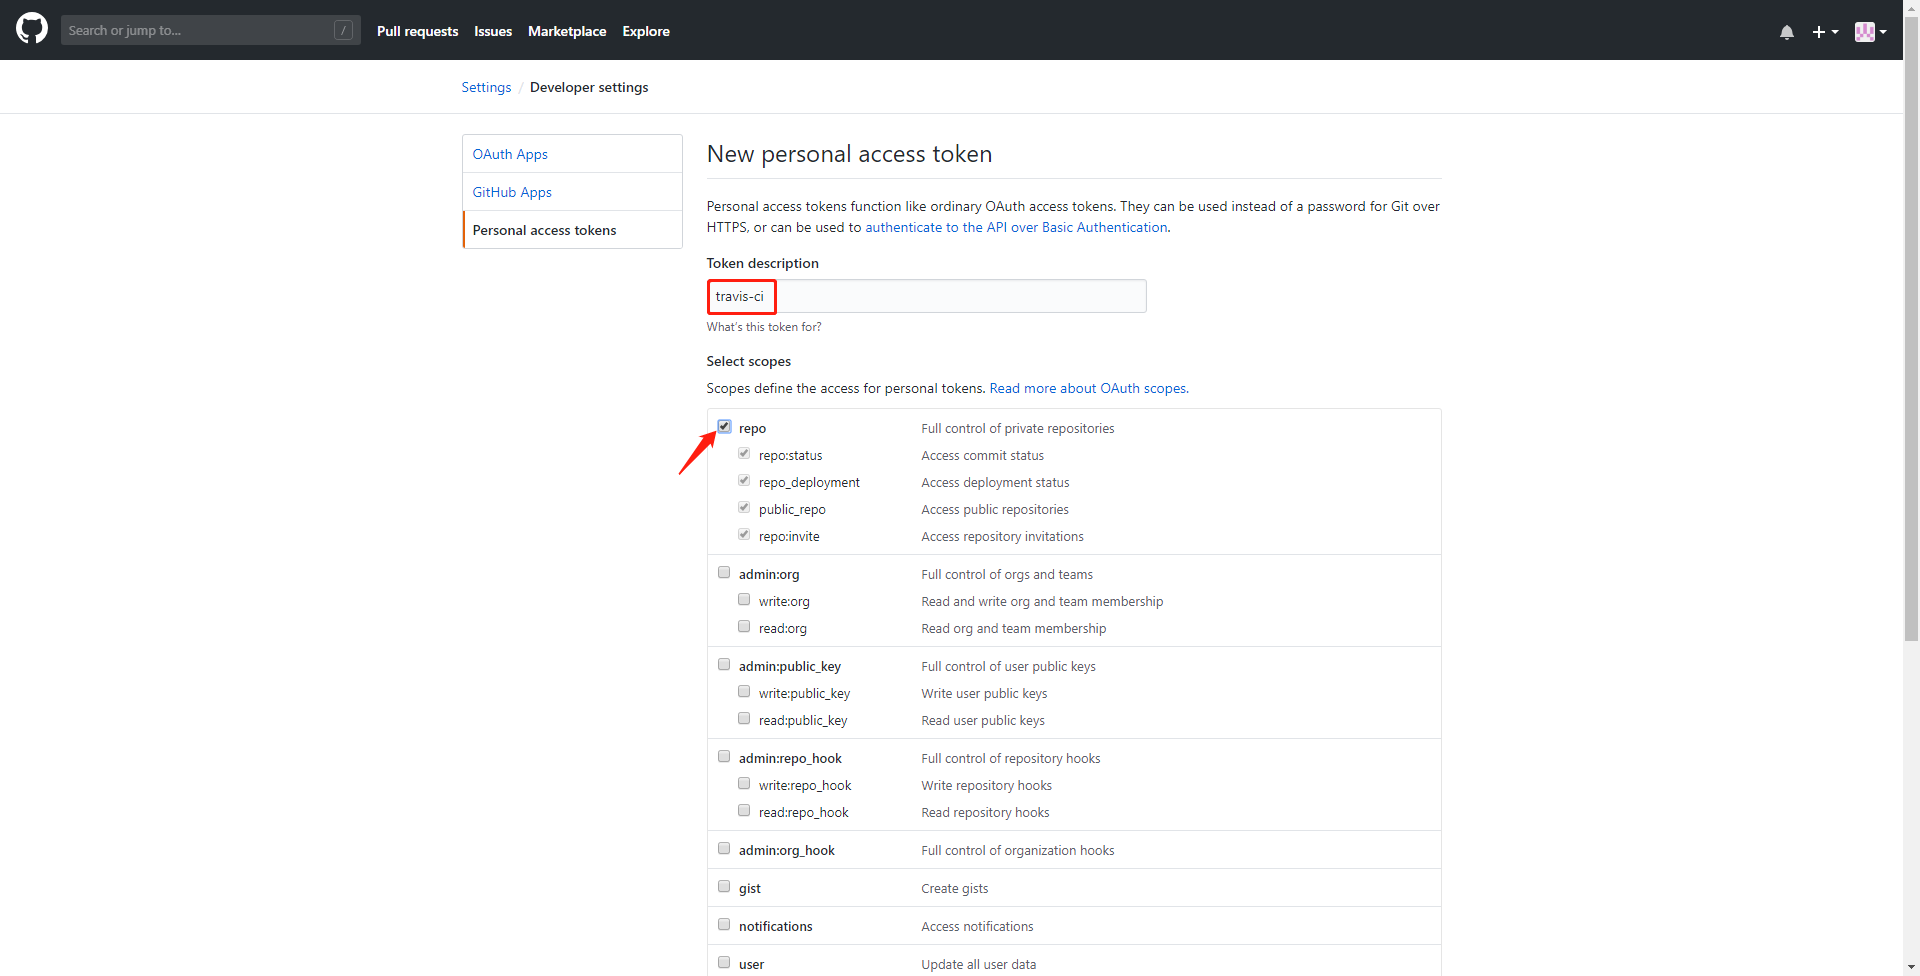
注意:token生成后只又一次查看的机会,一定要保存好,否则要删掉重新生成
设置Travis-CI
使用GitHub账号登录Travis-CI
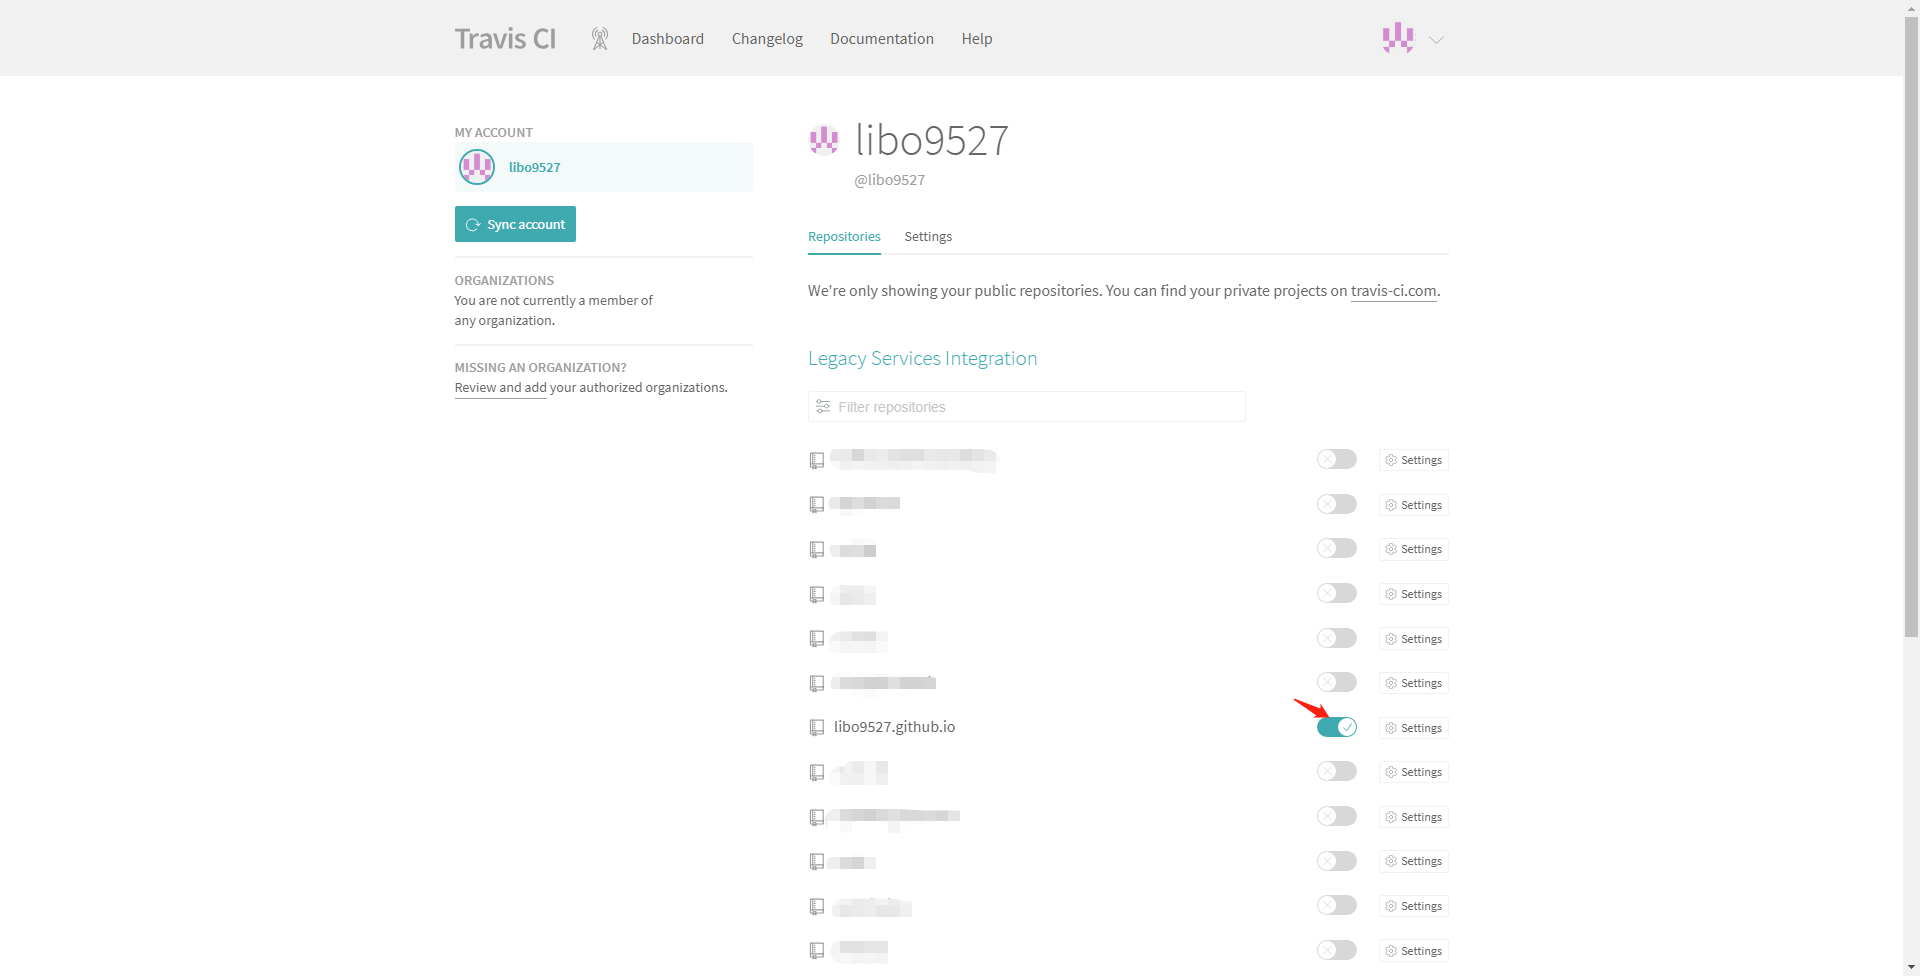
点击Settings,将GitHub生成的token添加到里面

hexo源码仓库中添加Travis-CI的配置文件.travis.yml
1 | language: node_js #设置语言 |
原理图
主题升级
为了更平滑的升级 NexT 主题,推荐使用 Hexo-Way
使用 Hexo-Way 的话,每次对站点配置文件的改动,需要重新执行 Hexo s 才能预览结果。但 NexT 是有热部署的,启动后直接刷新即可。但是采用 NexT-Way 的话,更新主题时,关于自定义的改动(除了主题配置文件以外的文件的改动)还是需要解决合并冲突的。所以还不如就全部通过合并冲突来解决。
直接在主题目录下执行 git pull,在 WebStrom 等 IDE 中解决冲突即可。IDE 对合并冲突都有很好的支持。
如果使用 Hexo-Way 方式,那关于 favicon avatar 等配置在本地环境中会失效(因为路径问题),但不影响线上效果。
确保不存在
/source/_data/next.yml文件站点配置文件中添加
theme_config属性将需要的配置从主题配置文件中 Copy 到该属性下。
_config.yml 1
2
3
4
5
6
7
8
9
10theme_config:
# Sidebar Avatar
avatar:
# Replace the default image and set the url here.
# url: #/images/avatar.gif
url: /images/avatar.jpg
# If true, the avatar will be dispalyed in circle.
rounded: true
# If true, the avatar will be rotated with the cursor.
rotated: true
想要升级时,只需在终端里切到 themes/next 目录下,执行 git pull 命令,并将需要改动的配置 Copy 到站点配置文件中即可。
主题优化
网页图标
1 | favicon: |
头像旋转
1 | # Sidebar Avatar |
单行注释使用//,多行使用/* */
修改/themes/next/source/css/_common/components/sidebar/sidebar-author.styl如下:
1 | .site-author-image { |
文章预览
文章封面
关闭主体配置文件中的
Automatically Excerpt1
2
3
4
5
6
7
8Automatically excerpt description in homepage as preamble text.
excerpt_description: false
Automatically Excerpt. Not recommend.
Please use <!-- more --> in the post to control excerpt accurately.
auto_excerpt:
enable: false
length: 150在
手动截断标签上只放一张图片即可1
2
<!-- more -->
评论系统


由于gitment长期未维护,所有最后使用gitalk,之后可以增加其他三方的评论插件更加灵活.
如需取消某个 页面/文章 的评论,在 md 文件的 front-matter 中增加 comments: false
自定义内建标签
进度条
自定义页面样式
调整文章元信息区域离文章主体的间距
一般文章都会添加description和一张图片作为封面,但元信息离正文太远视野上不舒服,故做如下调整。
修改themes/next/source/css/_schemes/Mist/_posts-expand.styl
1 | // before |
修改themes\next\source\css\_common\components\post\post-meta.styl如下:
1 | // before |
修改themes\next\source\css\_common\components\post\post-meta.styl如下:
1 | // before |
注意:在 Next.7 中,上述文件及改动如下
themes/next/source/css/_schemes/Mist/_posts-expand.styl
1 | // before |
显示文章更新时间
修改主题配置文件的
1 | post_meta: |
要想具体显示到时分秒,则修改站点配置文件的
1 | date_format: YYYY-MM-DD HH:mm:ss |
复制代码按钮
显示当前浏览进度
背景图片
文章加密
注意实在站点配置文件中添加
1 | # Security |
给文章添加密码:
1 |
|
- password: 是该博客加密使用的密码
- abstract: 是该博客的摘要,会显示在博客的列表页
- message: 这个是博客查看时,密码输入框上面的描述性文字
二次元看板娘
站内搜索
npm install hexo-generator-searchdb --save站点配置文件中添加如下配置:
1
2
3
4
5search:
path: search.xml
field: post
format: html
limit: 10000主题配置文件中打开如下配置:
1
2
3
4# Local search
# Dependencies: https://github.com/theme-next/hexo-generator-searchdb
local_search:
enable: true
文章置顶+置顶标签
使用插件hexo-generator-index-pin-top
1
2$ npm uninstall hexo-generator-index --save
$ npm install hexo-generator-index-pin-top --save在需要置顶的文章的
Front-matter中加上top: true/blog/themes/next/layout/_macro目录下的post.swig文件,定位到``标签下,做如下修改:1
2
3
4
5
6
7
8
9
10
11
12
13
14
15
16
17<div class="post-meta">
<span class="post-time">
{% set date_diff = date(post.date) != date(post.updated) %}
{% set time_diff = time(post.date) != time(post.updated) %}
{% set datetime_diff = date_diff or time_diff %}
{# 置顶标签 #}
{% if post.top %}
<i class="fa fa-thumb-tack"></i>
<font color=FFC0CB>置顶</font>
<span class="post-meta-divider">|</span>
{% endif %}
{# 置顶标签 #}
...
</span>
</div>
版权声明
修改主题配置文件中如下配置:
\source\_data 1
2
3
4
5
6
7# Creative Commons 4.0 International License.
# https://creativecommons.org/share-your-work/licensing-types-examples
# Available: by | by-nc | by-nc-nd | by-nc-sa | by-nd | by-sa | zero
creative_commons:
license: by-nc-sa
sidebar: false
post: true修改站点配置文件中如下配置:
_config.yml 1
2
3# URL
## If your site is put in a subdirectory, set url as 'http://yoursite.com/child' and root as '/child/'
url: http://username.github.io
首页隐藏指定文章
对主题 index.swig 文件做如下修改
Hexo\themes\next\layout 1
2
3
4
5
6
7{% for post in page.posts %}
{# 首页隐藏指定文章 #}
{% if post.hidden != true %}
{{ post_template.render(post, true) }}
{% endif %}
{# 首页隐藏指定文章 #}
{% endfor %}在需要首页隐藏的文章 front-matter 中添加
hidden: true
Emoji 表情
Hexo默认采用 hexo-renderer-marked 这个渲染器,但其不支持插件扩展。还有一个支持插件扩展的是 hexo-renderer-markdown-it,可以使用 markdwon-it-emoji 插件来支持 emoji。
替换渲染器
1
2npm un hexo-renderer-marked --save
npm i hexo-renderer-markdown-it --save安装
markdown-it-emoji插件1
npm i markdown-it-emoji --save
站点配置文件添加 markdown-it 配置
_config.yml 1
2
3
4
5
6
7
8
9
10
11
12
13
14
15
16
17
18
19
20
21
22
23
24
25
26## hexo-renderer-markdown-it
## Markdown-it config
## Docs: https://github.com/celsomiranda/hexo-renderer-markdown-it/wiki
markdown:
render:
html: true
xhtmlOut: false
breaks: true
linkify: true
typographer: true
quotes: '“”‘’'
plugins:
- markdown-it-abbr
- markdown-it-footnote
- markdown-it-ins
- markdown-it-sub
- markdown-it-sup
- markdown-it-emoji ## add emoji
anchors:
level: 2
collisionSuffix: 'v'
# If `true`, creates an anchor tag with a permalink besides the heading.
permalink: false
permalinkClass: header-anchor
# The symbol used to make the permalink
permalinkSymbol: ¶使用
在 EMOJI CHEAT SHEET 中找你想要的表情,点击即可复制。😄
文件下载功能
- 在
source目录下,新建download目录 - 通过诸如
[点击下载 xxx.pdf](/download/xxx.pdf)这样的链接,提供下载功能。
标签插件
Note
default 提示块标签
primary 提示块标签
success 提示块标签
info 提示块标签
warning 提示块标签
danger 提示块标签
主题配置文件中修改风格
1 | # Note tag (bs-callout) |
Tabs
This is Tab 1.
This is Tab 2.
This is Tab 3.
1 | {% tabs First unique name %} |
填坑记录
选用主题后页面空白
原因:themes目录下主题相关文件未正确提交到远程仓库
解决:
- 删除主题目录下的
.git目录和.gitignore文件 git rm --cached 主题目录git add 主题目录git push
命令 hexo d 无反应
原因:站点配置文件中关于部署的部分没有配置
1 | # Deployment |
解决方法:补充相关配置
1 | # Deployment |
命令 hexo d 报错:ERROR Deployer not found: git
原因:没安装hexo-deployer-git插件
解决方法:安装hexo-deployer-git插件
1 | npm install hexo-deployer-git --save |
写作
布局
Hexo 有三种默认布局:post、page 和 draft,它们分别对应不同的路径,而您自定义的其他布局和 post 相同,都将储存到 source/_posts 文件夹。
| 布局 | 路径 |
|---|---|
| post | source/_posts |
| page | source |
| draft | source/_drafts |
草稿
Hexo 的一种特殊布局:draft,这种布局在建立文章时会被保存到 source/_drafts 文件夹,您可通过 publish 命令将草稿移动到 source/_posts 文件夹。
1 | hexo publish [layout] <filename> |
注意:
hexo new命令新建文章时会将特殊字符(空格、加号等)转化为-eg:
1
2hexo new "GitHub Pages+Hexo+NexT"
INFO Created: E:\xxx\Hexo\source\_posts\GitHub-Pages-Hexo-NexT.md在使用
publish命令发布草稿时需要用文件名,而不是文章标题eg:
1
2hexo publish post GitHub-Pages-Hexo-NexT # post可以省略,因为layout默认就是post
INFO Published: E:\Github\Hexo\source\_posts\GitHub-Pages-Hexo-NexT.md文件名为空时默认发布第一篇草稿
eg:
1
2
3hexo publish post .
或者
hexo publish post ""
代码块
Hexo 格式
代码:
1
2
3
4
5{% codeblock lang:java title http://www.baidu.com link test %}
public static void main(String[] args) {
	...
}
{% endcodeblock %}样式:
![img]()
Markdown 格式
代码:
titlelink test 1
2
3public static void main(String[] args) {
...
}样式:
![img]()

引用站内文章
语法:
1 | {% post_link slug [title] %} |
slug
_posts 文件夹下需要引用的文章的 markdown 文件的名字,不带后缀
title
链接显示的文字
eg:
1 | {% post_link Comments 留言板 %} |
效果:
底层原理
1 |